Archive for February, 2010 —

Operation hot tub

The hot tub arrived on-site today and was promptly hoisted up to the roof by a giant crane.

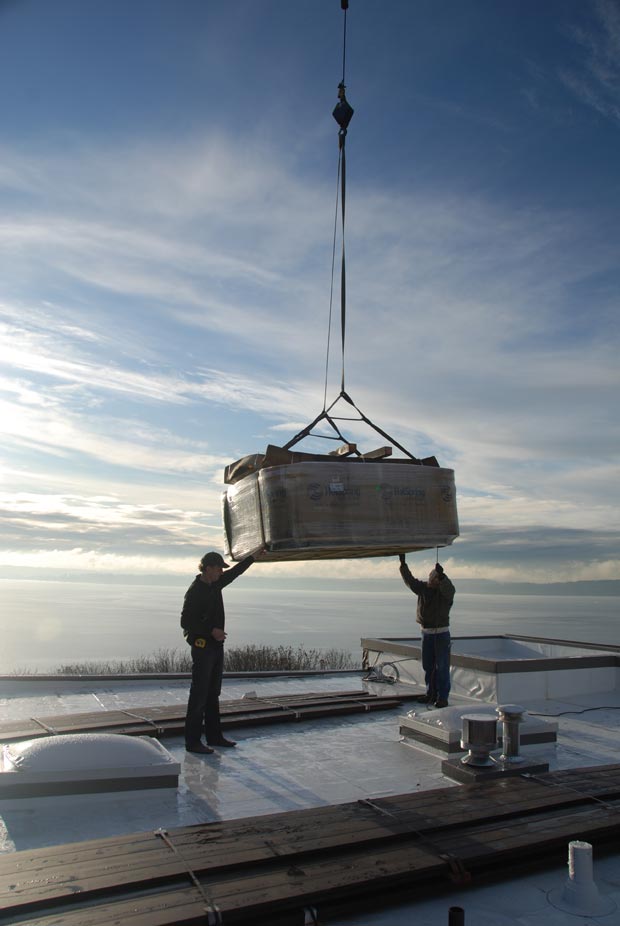
Watching the crane operator from Plywood Supply gently position the spa into place with the help of several of the people on site was pretty amazing. It seemed extremely dangerous to me but stuff gets hoisted onto roofs all the time, I guess… usually without incident.

Three bald eagles showed up to watch as well, which was cool. The full photo gallery of “Operation Hot Tub” is available here.

Hot tub specifics

First let me say that comparison shopping for hot tubs sucks. There are a few web sites which claim to be “hot tub buying guides”, but most seem shady and designed to push you towards particular purchases. None seem particularly interested in taking a comprehensive look at the world of spas, from a consumer standpoint.

I made the decision to buy a HotSpring spa from Olympic Hot Tub Company several months ago for three reasons:

  • Some friends of mine have a relatively new one and love it.
  • HotSpring makes a mid-size model, the “Sovereign”, that fits into the space we had available and has a super-nice lounge seat inside the tub.
  • When checking out just about every single brand of hot tub, all of the salespeople were very quick to talk shit about other brands, but none said anything bad about HotSpring. Some even specifically said things like “Well, I can’t compete against HotSpring, but besides that, we are pretty much top of the class.”

It was this last point that ended up pushing HotSpring to the top of my list. I really want the Honda of spas here; trusty, good performance, and no maintenance. Many other tubs had a lot more bells and whistles, but I just want something that will never have to be replaced.

I can’t wait to fire this thing up. As mentioned in a previous post, the cost to run it year-round should be only about $14 a month.

Costs accrued during this stage:

HotSpring Sovereign Hot Tub$10,394.29

Drywall is complete

Thanks to Israel Avalos and the hard working crew at PJJ Construction, drywall work is now complete. The crew will be back to fix any damage caused by ongoing construction, but as of last week, all drywall is hung, taped, and mudded, and it looks great. Israel’s crew has done such a good job over the last two months since drywall work began that we are using them for a good amount of interior carpentry as well.

There isn’t a whole lot of detail to discuss about the process of hanging drywall, but we ended up going with a mix of “level 4” and “level 5” drywall around the house. Level 4 drywall installation essentially means that the finish is smooth, seamless, and fit for display in most public areas around the house. If you had an area you wanted to cheap out on like a basement laundry room, you might go level 3 there, which wouldn’t be as nice of a finish. Level 5 finish, on the other hand, is designed for areas with particularly harsh lighting conditions like huge art walls that are exposed to the sun. In a level 5 finish, the entire wall is skim-coated before it is primed. Since we have a lot of large walls that are heavily exposed to the sun coming off the water, all of these areas got the level 5 treatment.

There’s a gallery of some of the drywall pictures here.

Costs accrued during this stage:

PJ Construction (drywall)$22,353.00
Dehumidifier rental$1,017.39
Honeybucket rental$117.19
Take It Away Hauling$490.95
Miscellaneous expenses$937.81

Interior carpentry continues

This is probably the least interesting entry of the blog so far, but interior carpentry work has been going on for the last couple of months and I needed an entry to capture the costs associated with it. Build along with PJJ Construction have been doing most of the work and it includes such things as fabricating bamboo stair treads, cutting and installing baseboards, chopping back wall portions, and a thousand other things that need elbow grease around the site. I’ll probably do one more of these housekeeping entries before the house is complete (about 6 weeks!), but I’m trying to keep my accounting of cash outflows reasonably accurate, and hence, I’m posting this now.

Costs accrued during this stage:

Wood for interior carpentry (Plywood supply)$1,021.53
Wood for interior carpentry (Compton Lumber)$2,000.63
PJ Construction (carpentry)$7,703.95
General carpentry (Build LLC)$6,502.50
General installs (Build LLC)$6,235.00
Honeybucket rental$117.19

Architectural visualizations using holograms

As readers of this blog know, I’m a huge fan of photorealistic 3D modeling to aid the architectural design process. In the course of building this house, I had a idea for an invention which could potentially be even more useful than 3D renderings in some cases. I may end up pursuing it… we’ll see.

Via Freshome, however, comes this nifty piece of technology:

A holographic display to aid in the visualization of your new home. Very interesting stuff. It still doesn’t solve the spatial problems I’m looking to solve with my idea, but it’s interesting and potentially useful nonetheless. How much would I have paid for something like this during the design process? Probably only a grand or two. Seems useful though.

Interior design is harder than it looks

So far the toughest part of this project for my girlfriend and me has been picking interior finishes; particularly counters and tiles for the bathrooms. Having been in thousands of bathrooms before, we thought this would be a relatively easy endeavor. So much so, that we unfortunately gave ourselves only about a month of time to look at showrooms and select products.

Build has talked about choice and how too much of it can actually lead you away from happiness instead of towards it, and nowhere is this more apparent than in kitchen and bath showrooms. There are thousands of tiles, thousands of countertops, and thousands of faucets, sinks, and towel bars to choose from. It’s so overwhelming, in fact, that I don’t even have another life experience to compare it to. If you were remodeling and you just needed to pick a new floor tile, that might not be so bad, but when you’re starting from scratch, you need to pick somewhere between 5 and 20 products, all of which must go great together. An employee at one of the tile stores told us to expect five trips to the store for every room you have.

After 20 or so trips to different stores, we found ourselves still at square one. A few ideas had emerged, but we lacked the confidence to try and put everything together on our own.

It was at this point when we finally cried uncle and sought the help of an interior design firm. Through the recommendation of a friend, we called Nancy Burfiend and Lana Noble of The NB Design Group and asked if they’d be willing to give us a bit of a last minute triage for our problem. Nancy’s firm is very high-end and usually comes in a lot earlier in a project, but given that we just needed to make a quick decision on tiles, countertops, and a few other things within a couple weeks’ time, she agreed to provide us some overall direction, answer our questions, and present a couple of options, all within a compressed time frame and on an hourly fee schedule.

This beautiful shot from The NB Design Group’s portfolio was one that attracted us to working with Nancy.

Aside from providing some excellent tile options, NB also gave us some great advice we wouldn’t have otherwise considered, including:

  • When you’re dealing with a small space, as we are in our bathrooms, you should try to use big tiles. Big tiles make small spaces seem bigger.
  • Use the same color tile on the floor as you do on the tub surround in order to keep the space from looking broken up.
  • Don’t be afraid to run tile clear up to the ceiling.
  • Use similar elements in all bathrooms in order to keep the house from feeling too “novelty”.
  • Be careful not to use too much overhead lighting in bathrooms as it’s poor for applying makeup.
  • Frosted glass on shower doors can make bathrooms look smaller.

In retrospect, it’s a bit silly to think we could have done a great job designing our kitchen and bathrooms without at least a small amount of help from interior design professionals. I have a self-service mentality about a lot of design work, but it was a major miscalculation to let this important element go so long without dedicated, professional help. In the end, we took a lot of NB’s advice and selections while at the same time providing a few materials of our own, as well as following Build’s advice for much of the rest of the interior. We won’t know for sure until everything is installed, but by seeking out a great interior design firm, our confidence has gone from about a 1 to maybe a 9.

If I have any advice for aspiring home builders, it would be to not overlook this step. It’s extremely difficult to get perfect and should not be left to last minute. Whether you seek out a full-service firm like NB or just use a solo interior designer, the end result is bound to be better than what you’d do on your own.

Costs accrued during this stage:

Interior design consulting (NB Design Group)$1,931.25