
Drywall is complete
Thanks to Israel Avalos and the hard working crew at PJJ Construction, drywall work is now complete. The crew will be back to fix any damage caused by ongoing construction, but as of last week, all drywall is hung, taped, and mudded, and it looks great. Israel’s crew has done such a good job over the last two months since drywall work began that we are using them for a good amount of interior carpentry as well.
There isn’t a whole lot of detail to discuss about the process of hanging drywall, but we ended up going with a mix of “level 4” and “level 5” drywall around the house. Level 4 drywall installation essentially means that the finish is smooth, seamless, and fit for display in most public areas around the house. If you had an area you wanted to cheap out on like a basement laundry room, you might go level 3 there, which wouldn’t be as nice of a finish. Level 5 finish, on the other hand, is designed for areas with particularly harsh lighting conditions like huge art walls that are exposed to the sun. In a level 5 finish, the entire wall is skim-coated before it is primed. Since we have a lot of large walls that are heavily exposed to the sun coming off the water, all of these areas got the level 5 treatment.
There’s a gallery of some of the drywall pictures here.
Costs accrued during this stage:
| PJ Construction (drywall) | $22,353.00 |
| Dehumidifier rental | $1,017.39 |
| Honeybucket rental | $117.19 |
| Take It Away Hauling | $490.95 |
| Miscellaneous expenses | $937.81 |
Hey Mike,
The progress looks great, congrats. A couple questions for you:
1. I couldn’t tell from the photos, but are you going to use a standard wood/composite/pvc trim or something more modern like an L-bead around the doors and windows? (The baseboard moulding looks awesome btw)
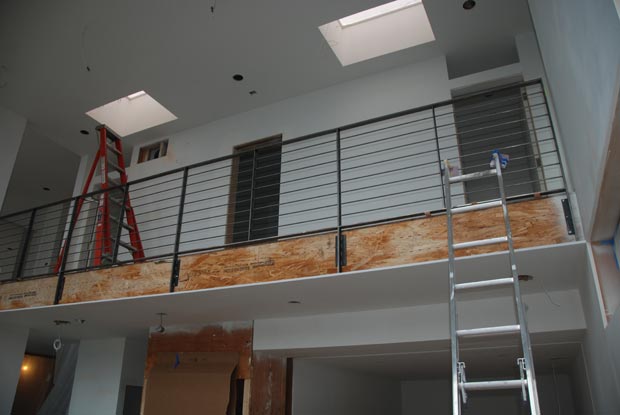
2. What type of railing do you have on the catwalk and stairway? It doesn’t look like the semi-ubiquitious cable railing in modern homes. Is it a 1/2″ steel dow?
Thanks.
Hi Barry:
1. I’ll let Build chime in on that. Not exactly sure what it is, but it’s super low profile.
2. The railing is custom made, locally, by a fellow named Olda Zinke. I’ll have a post on that specifically this week… possibly even tonight.
Barry-
Over the last 10 years, we’ve tried all kinds of wraps for our aluminum windows. We first used drywall with elastomeric caulk for attachment to the windows but that wouldn’t weather as well (the caulk would eventually crack, unevenly).
We then moved to an L-metal with small, 1/16″ reveal. This was pretty successful, but labor intensive and the install/ mudding could end up damaging the window finish.
Then, the “pull-out zip-strip” was released- a two component vinyl that protected the window during mudding and paint. Even with this, we haven’t been entirely satisfied with the crispness of the result- you still have the interior window corners to tape and the pull-out leaves a little larger gap to the window than we’d like.
For Mike’s house, we’ve unleashed our best result to date. We used wood wraps with a dato on the wall edge side to receive a corner bead of drywall. It matches our wood door jambs on our passage and pocket doors, and has a small reveal that ties with our other details in the home (such as the flush base that you’re liking and we like too).
As for the railing, that is 2″ flat bar with 3/8″ rods. The bars are welded and ground smooth and the rods have a very small plug weld at each vertical. The whole assembly is made from cold rolled steel (no mill scale), cleaned, conditioned and waxed.