
The Cabinet Package
One of the single biggest budget items of the house was the cabinet package. Custom cabinets are very expensive, no matter who builds them for you and what materials they use. If you’re looking to save a good chunk of change on your house project, cutting out the custom cabinets can go a long way. Short of custom, you can go with stock cabinets (like what you see at Ikea) or “semi-custom” cabinets, which are essentially pre-made but can have certain dimensions modified.

Open shelving at the end of the large kitchen cabinet makes for a nice glassware display.
I ended up spending $61,867.50 on my custom cabinets, and that included a fairly extensive ensemble in the kitchen, consoles in four bathrooms, a large dresser/armoire in the master bedroom, a full package in the walk-in closet, and a built-in desk for the office. This number could have easily been closer to $90,000 had I chosen a different cabinet maker, but could have also been closer to $20,000 if I went with stock stuff.
User interface around the house, in general, is a very big deal to me, and in the end, I felt that only custom cabinets would let me make the most out of the space and ensure that everything fit perfectly and provided easy access to the contents within.
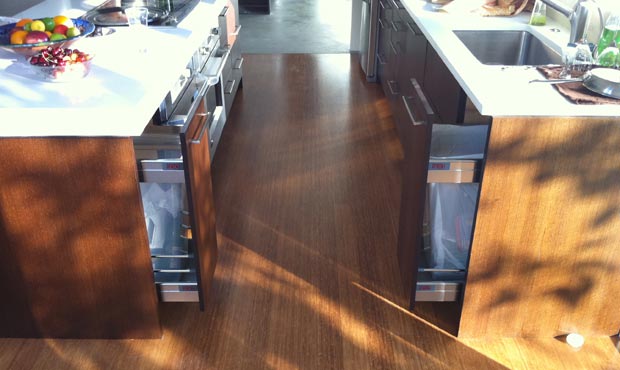
One of my favorite interface features: dueling trash and recycle drawers for easy access.
In general, we’re happy with how the cabinets turned out, from a design and usability standpoint, but there are some color inconsistencies and visible veneer seams that we feel could have been avoided if a different process had been used. The cabinet shop that designed and produced our cabinets uses a process called “spray finishing” which we knew nothing about before embarking on this project. Essentially, there are two ways to coat a cabinet: by staining it with a paint brush and stain or by putting each piece into a booth and spraying it with clear finish. This clear finish can be mixed with “tint” to help alter the color of the wood.
We specified espresso-colored cabinets from the beginning so we figured it would just be a question of laminating some rift-sawn oak to some plywood and then staining/spraying it a dark brown. We’d seen thousands of espresso-colored cabinets before so it didn’t seem like a complicated process. The shop began showing us sprayed samples and none of them looked right. They all looked more walnut-like in color than espresso-like. After going through probably 15 samples, the suggestion was made that we try a wood called wenge, which is a lot closer to espresso-color than oak. It’s a very hard African wood and it looked really nice to us so we said ok. The wenge ended up tinting pretty nicely and was close enough to espresso that we signed off on it.
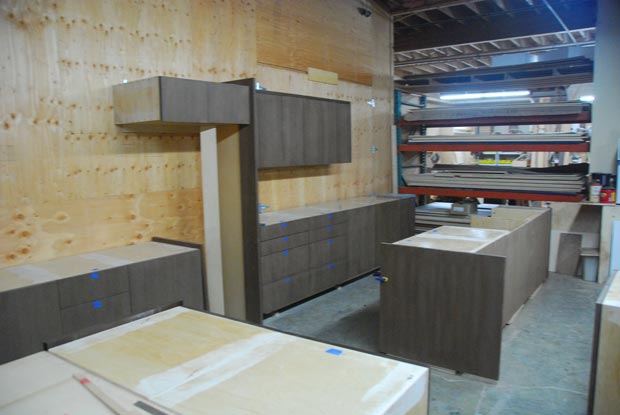
Here’s what the cabinets looked like in the shop, before finishing.
Unfortunately, a few months later, as the cabinets were installed, we noticed that the edge pieces were much darker than the faces. The reason for this is that the edges were made with wenge hardwood and not the thin veneer on the cabinet faces. The end result is sort of a “two tone” cabinet, in dark brown and much darker brown. To add to that, the color of the wenge varied from room to room and sometimes even board to board. Definitely not what we were expecting. Additionally, the porous nature of the wenge did not seem to take the spray finish evenly and needed touching up in multiple places.
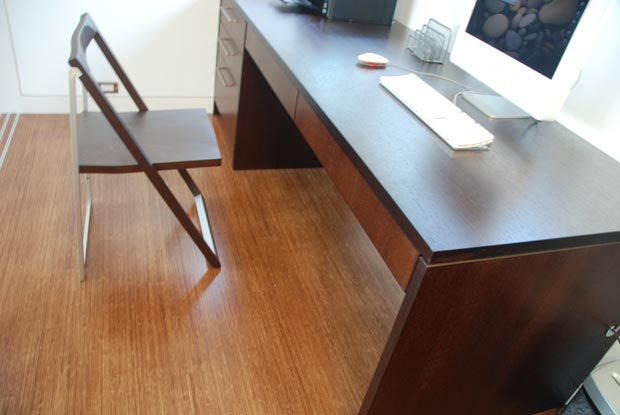
A very handsome built-in desk, but note the color difference between the surfaces.
There were several things we had the cabinet shop fix, and to their credit, they were very friendly and responsive about making things right, but the cabinet color was something that couldn’t be fixed without a complete redo. Given the fact that this color could conceivably be construed as intentional and it was extremely unlikely any visitors would ever notice anything was wrong, we decided to just live with them.
The color isn’t something that bothers us every day and we’ve pretty much gotten over the entire issue, but we did learn some lessons:
- Although spray finishing is, according to some, a high-end way to finish cabinets, do not try to radically alter the color of a wood with it. It should only be used when you are looking for a clear finish or perhaps go a shade darker. I wish the shop had apprised us of this.
- Do not use a wood that your cabinet shop has never used before. Woods vary tremendously in how they react to coatings and you don’t want any surprises in your project.
- Participate vigorously in the user interface design of your cabinets. Because we thought of things like where we want to toast our bread and where we want the garbage and recycle drawers to be, using the cabinets is a breeze.
- For areas like walk-in closets, consider building cabinets with both hanger bars and adjustable shelves built in. That way, you can fine-tune the amount of hanging and folding space to suit your clothing inventory.
- Know when to insist on fixes and when to let things go. Cabinetry is never perfect and if you insist on perfection, you’re going to end up making a lot of honest people redo their honest work.
Be sure to check out more photos of the cabinet package in the photo gallery.
Costs accrued during this stage:
| Cabinets | $61,867.50 |

While it’s true that cabinetry is never perfect, a true master cabinetmaker knows precisely how to hide the mistakes that they do make. Considering that you spent more on your cabinets than some people spend on their homes, I would have expected that the shop not make promises that they couldn’t keep that would require you to request that many fixes.
The comments about the potential faults of spray finishes are spot-on. A much better approach that looks just as high-end, if not even better, is a hand-rubbed stain with a sprayed-on satin polyurethane protective topcoat.
Karl: Yep, I agree. The red flag should have been when the oak wasn’t turning out as expected, considering I was positive I’d seen plenty of espresso-colored oak cabinets before. At that point, we were early enough in the process to go in another direction without creating too much waste. Things you unfortunately have to learn along the way… that’s part of why I’m writing this blog in the first place: to help people never make the same mistake once.
That said, we’re at peace with the cabinets, guests would never know anything was unplanned, and they do look great in general.
Mike,
I take Karl’s point about a true master cabinetmaker being able to hide mistakes and the imperfections and inherent inconsistencies that come from a custom made (not factory made) product, but I think that a limiting factor on many projects, even those with healthy budgets, is time (which equals money). In an ideal world, we would have found a master craftsman who would have produced impecable work, but given the amount of millwork for our build, I suspect we would have had to wait a long long time for the end result. Our millwork was the single biggest ticket item in our project. For what we paid, we probably could have employed a master craftsman full time for two years, but we needed to get into the house on a timely basis. The reality is that most people need to balance end result with timeliness, and sometimes, even in a high end custom home, the end result may suffer a bit in the interests of timeliness.
I don’t know whether this will make you feel any better about your experiences, but my contractor (who I think the world of) told me that on every job, the millwork is always a headache. It certainly was for us. We had what our architect called an “intense” millwork package. The only room without custom millwork (cabinets, wardrobes, built in bookshelves or desks) of some sort was the furnace room. We had a gruelling prolonged saga to get the cabinetry to the point where we could live with the remaining inconsistencies and flaws.
In our situation, our millwork supplier was under pressure to produce the stuff on time, and I think that the volume and time pressures affected the end result. (Our move in date was still delayed by the millwork, which is a common story.) The imperfections really bothered me initially because we paid a lot of money and I felt that we hadn’t gotten what we had bargained for, but I am much more philosophical now. The millwork enhances the functionality of our home, and everyone who visits tells me how great it looks. Only I notice the problems.
I have been superimpressed by the amount of research and thought that you’ve put into your own project. It sounds like a backwards compliment, but if you had problems with your millwork, it makes me feel that there was no way I could have avoided problems on my millwork. (Hope that comes across the way I intend.)
Congratulations on the house. It (and the millwork) look great.
Toronto Modern: Yep, time is always a gating factor when it comes to how perfect your end result will be. The thing that bothered me here was not so much the actual craftsmanship but rather the planning. Even though the whole house project was planned extremely well and came in on budget, most of the things that didn’t go well were the result of suboptimal planning. As far as I can tell, the whole idea of getting espresso colored cabinets without staining them was just doomed from the start. There was just no way to make that happen. So to think all of this work was done making them, and then adjusting them, and then readjusting them, only to end up with something that still didn’t match the spec is disappointing. It’s one thing when some subcontractor along the way just doesn’t put a piece of the house together properly, but it’s another when the plan for that part of the job just didn’t allow for success in the first place.
Mike,
To tag on to your comment, I would like to ask if and how your contractors were involved in this process? I would imagine that, considering Build operates a custom cabinet/furniture shop on the side, they would be thoroughly familiar with these processes and would have advised you of better alternatives at an earlier stage.
Regardless, you (and Build) should be proud of what you accomplished together, the house is nothing short of phenomenal!
Mike,
We are in the process of choosing our cabinet wood and stain now and for some reason I’m having a difficult time making that decision. First of all, I just discovered that most flat front cabinets are made of veneer and not solid wood. For some reason I have always thought as solid wood cabinets the best and am having trouble choosing/adjusting. What kind of wood did you go with for your cabinets? Is it oak? We have looked at bamboo (stained medium-dark) and at cherry (which according to my architect shows too much movement for a modern home).
Any thoughts/ideas would be greatly appreciated.
Thanks,
Juli
Sorry, one more question for you:). I am also trying to figure out what is a good distance to have between the cooktop wall and the island, which houses the main sink. How many feet did you go with in the above picture of your kitchen, between your cooktop and sink? I worry about that area since it will be used the most and by multiple people at once (someone doing dishes while someone else will be cooking right behind them). We are thinking maybe four and a half feet, but I wonder if that is too big?
Thank you again,
Juli
Juli: Yeah, I was under the impression that solid oak cabinets were the best as well, but many cabinet makers will tell you that veneered cabinets have a lot of advantages over solid. The main one I remember — I think — was that they are less likely to warp over time. Here’s an article about them.
I went with a wenge veneer over plywood, and then maple for the unexposed parts on the insides. I would not recommend wenge. You’re better off going with something like quarter sawn oak veneer. Go to Pedini in Seattle to look at their modern stuff. It looks great. They actually use machined poplar veneer for most of their stuff and just stain it to look like other woods. Looks extremely uniform… almost too much so though. Again though, if I did it over again, I would use an oak veneer and stain it whatever color I wanted (espresso).
As for the distance from the counter to the island, it’s 4 feet. Plenty of space for us.
Mike, thank you for your thoughts once more. I am starting to like oak veneer as well, but I wonder if it will clash with my rift cut quarter sawn oak floor that I’m putting in. I guess if I go with different enough stains it might be ok.
Did you ever consider bamboo cabinets? They seem to have some in darker stains that look pretty modern. Any thoughts?
I’m sure glad you’ve been helping me get some answers; thanks a ton. I wonder if you’re tired to death of answering more questions about your awesome house!!!
Juli
Staining bamboo anything but clear is usually not recommended.