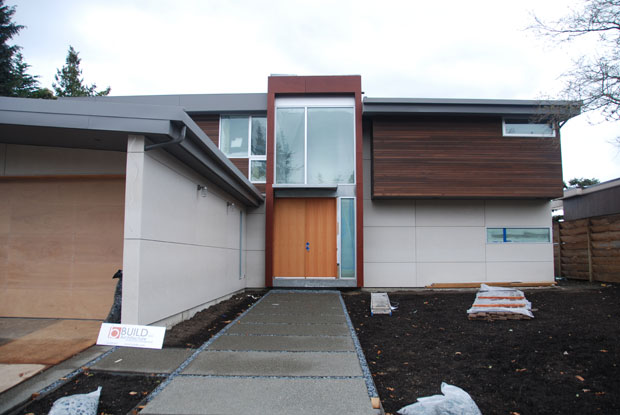
The new awning and front stairs are complete

We’re in hopefully the last week of work right now, as various punchlist items get taken care of and we get ready to move in. One item I discussed several weeks ago in “Offing the Awning” was the poor appearance of the front canopy. I’m happy to say that this has now been successfully resolved and we have a beautiful new canopy in front which ties in much more tightly to the overall design of the house:

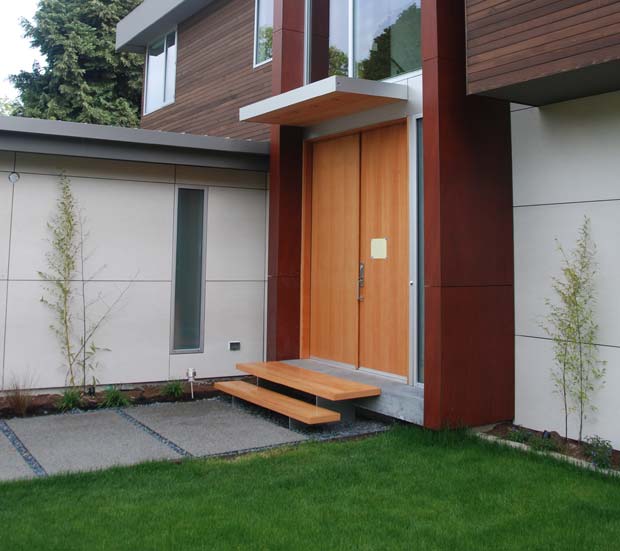
The fir from the canopy, door, and stairs now tie together beautifully.

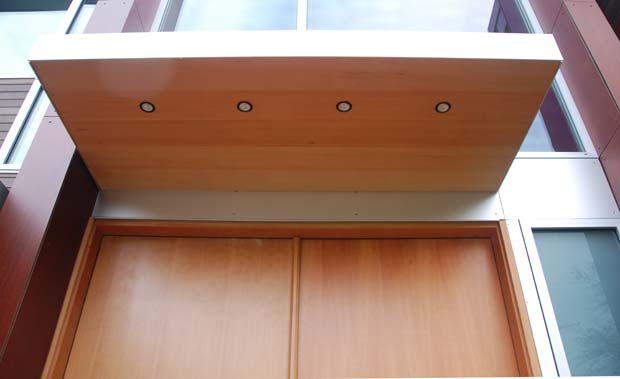
The puck lighting underneath the canopy provides just the right amount of light to illuminate the wood.

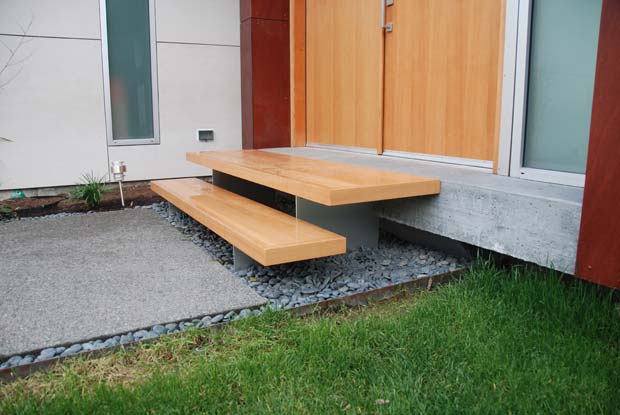
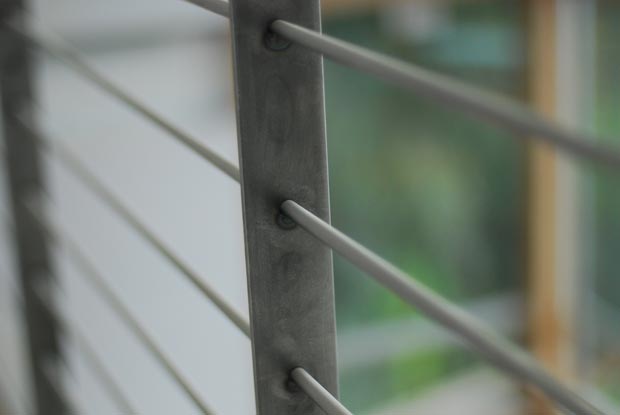
The fir stairs provide a warm entrance and the aluminum underneath offers a minimalist support structure.

Overall, I’m extremely happy with the finished product. This is one of a handful of items we pushed back on very hard from a design standpoint, and although it felt stressful and unsatisfying at the time, I’m really glad we insisted on this refined approach. It cost me a few thousand dollars in the end, but since we’re still using the steel frame of the original canopy inside of the aluminum/fir casing, it’s still providing some value. UPDATE: Kevin from Build pointed out to me that although the finished cost of the canopy is more than originally spec’d, not a penny of the cost was actually wasted due to the fact that the steel frame is simply acting as the skeleton now. Fair point.

Not to be overlooked, the fir stairs are also the result of pushing back against a proposed solution (steel) that we never got comfortable with. The lesson for this phase of the project is: if you aren’t comfortable with a certain material, insist that it be eliminated as an option early on. Occasionally you will be pleasantly surprised by such things, but more often, you know your tastes better than anyone else does.

Costs accrued during this stage:

Front canopy fabrication (Twisted Metalworks)$1,000.00
Galvanize front canopy (Scott Galvanizing)$416.10
Aluminum for redone canopy (Alaskan Copper & Brass)$687.00
Aluminum anodizing for redone canopy (Hytek Finishes)$300.00
Delivery of anodized aluminum for redone canopy (Pacific Delivery)$130.81
Delivery charges (Pacific Delivery Service)$352.18
Miscellaneous materials (Compton Lumber)$1,198.59
Aluminum fabrication for redone canopy (Special Projects Division)$832.20

Ok, now we’re really almost done

In my last post from six weeks ago, I wrote that we were three weeks away from completion according to the schedule, but that it felt more like six weeks out to me. Well, it’s six weeks now, and we’re mere days away from final inspection and an occupancy permit. As of now, we’re aiming for next week.

A lot has gone on in the final two months of construction that has served to push our date back, including:

  • An extensively cracked concrete floor
  • Various parts — mostly electronic — which are not stocked locally and have taken weeks to arrive
  • Redoing the awning
  • Redoing some tile
  • Settling on a lighting scheme
  • Dealing with the technological circus that is our exterior motorized blinds

… and several other things.

I haven’t posted about all of this stuff individually yet, because I’m waiting for resolution first. Since I’m naming sub-contractors here (generally endorsing their good work), I don’t want to publish a negative post when something goes wrong only to have the sub-contractor go out of their way to make everything right. I try to judge everyone on this job not just by their ability to avoid problems but mostly by the final outcome of their work. For things like our bamboo floor, our concrete hallway, and the motorized blinds, the “final outcome” has been very much in limbo for months now as contractors finish up their work. When it’s all done next week, I will have full posts on each item.

We’re still very much on budget, and although we are about two months past the originally planned completion date, I would argue that date was too aggressive to begin with. Nice houses take time, and 9 months just isn’t long enough. If we get done in the next two weeks, it will be 11 months from when deconstruction began, and I’m perfectly satisfied with that duration.

Coming down the home stretch

According to the schedule, we’re only about three weeks away from occupancy now. From looking at the house, it feels more like six weeks, but I’m told things come together extremely rapidly at the end. So many of the surfaces are still covered in protection and there’s so much dust and debris around that it just looks a lot less finished than it actually is. On the bright side, coming to the house every day now is a complete joy as a new element is finished and uncovered almost every day.

If we really end up being done in three weeks, the project will have come in only about five or six weeks late and only about $8000 over budget. I’ll explain this in a later post, but both the time and the budget are a bit misleading though because we added approximately 1300 square feet in the form of a fully finished basement and some other things to the project and still came in close to the original monetary and time budgets.

Things are definitely getting a little hectic as Build and the many different subcontractors involved at this point scramble to put all of the remaining pieces in place. There are a ton of things to coordinate and if I was acting as my own G.C., this is where things would really start to fall apart, if they hadn’t already.

I have a bunch of miscellaneous costs to recognize in this post that have occurred over the last couple of months, so if you have costs turned on, you should see them below.

Costs accrued during this stage:

Millwork supplies (Compton Lumber)$2,062.64
Carpentry labor (Rivera 26 Remodeling)$1,256.51
Carpentry labor (Rivera 26 Remodeling)$1,809.30
Carpentry materials (Compton Lumber)$801.62
Carpentry labor (Rivera 26 Remodeling)$2,890.80
Installs, carpentry, and general conditions (Build LLC)$11,675.00
Honeybucket rental$117.19
Installs, carpentry, and general conditions (Build LLC)$11,295.00
Debris removal (Take-It-Away Hauling)$598.45
Fence rental additional month (National Construction Rentals)$26.67
Honeybucket rental$125.71
Miscellaneous materials (Tacoma Screw)$90.32
Miscellaneous site work (Economy Concrete Cutting)$328.50
Miscellaneous expenses$387.21
Miscellaneous expenses$1,826.51
Gas line install (Puget Sound Energy)$3,651.00
Seattle City Light (power connect fee)$789.00

Offing the Awning

Every so often, a design element just doesn’t end up looking good. Such is the case for the galvanized steel awning that went up above the front door. There are a few things wrong with it, in my opinion, but of course, this is all subjective:

  • The galvanized steel just doesn’t go with the rest of the house and is too industrial looking.
  • The scale does not look right. It’s neither as thick as the elements around it, nor as thin as some of the aluminum details near it. It also seems like it should span all the way across the box.
  • It doesn’t provide a mechanism to cleanly conceal lighting which should inconspicuously light the front door area.

Sometimes when less-than-ideal elements go up, you can make a few tweaks here and there to salvage the situation, but I think this was just a clear (and rare) case of a design miss. Build is working on some ways to keep the steel structure up to provide stiffness and wrap it with a different material, like aluminum or fir, whilst providing a means to conceal puck lighting inside.

My lesson from this is to stand strong against materials you don’t particularly care for. I’ve never liked galvanized steel and underestimated the effect it would have on the front entryway. I’m sure things will work out fine but this is a misstep I would have rather avoided.

It’s Almost Planting Time

As the house nears completion (hopefully only about four weeks away!), we’ve spent the last month researching landscaping options. I’ve heard that most new construction projects end up devouring the homeowner’s entire budget and landscaping is usually the first item to get axed, so I’ve been anticipating that the same would happen with this project. Thankfully, we’re currently still less than $10,000 over our original budget so we can follow through with landscaping.

In talking to a few landscape design firms, it quickly became clear to me that “landscaping” can be as cheap or expensive as you want it to be. For $500, you can put a lawn in, and for $250,000, you can create your own Buchart Gardens. Solo design/landscapers may charge as little as $25 a hour while high end firms are closer to $100.

My problem with spending a lot on landscaping before we even move into the house is that I’m really not sure what sort of scheme will work best yet. There are a few things we know we want like black bamboo and an understated Japanese motif, but beyond that, it’s a crapshoot. For that reason, we’ve hired a woman named Alex Tomy (of Alexandria’s Creations) to collaborate with Build on a design that will get us off to a good start and let us make any modifications or enhancements later. Alex has been taking care of two of our neighbors’ houses for over 10 years so she knows the micro-climate better than anyone. While Build handled the hardscape design, Alex is handling the flora.

We decided to concentrate 80% of our effort on the front yard and 20% on the south side yard for now, since those are the areas in most need of design. The backyard (pictured in the header of this blog) is already beautiful, and although it will get a trim and a bit of a refresh, it can wait.

We also decided to go with a ryegrass/fescue lawn in front, despite some earlier flirtations with ground cover. Thanks to Dave’s encouragement, I think we can easily handle the small amount of maintenance that this will require… and if not, there’s always neighborhood kids to do the mowing. We will, however, be using ground cover in the backyard when we get around to it.

Finally, we also decided to line the house and many paths leading to and around it with black mexican beach pebbles. See this concrete path for the inspiration behind the idea. I’ve always loved this look, and for about $1300, we got 6000 pounds of them… enough line the entire house and probably also create a fire pit with.

I don’t have the final bills for landscaping related stuff yet, but I estimate the actual planting part of it (i.e. minus the hardscapes, decking, etc.) will come around $7,000.

Here’s a detailed breakdown of what’s going in and a PDF of Alex’s handcrafted plans:

Shrubs

  • Hydrangea Macrophylla (Red Mopheads)
  • Hydrangea Quercifolia (Alice)
  • Nandina Domestica (Moon Bay)
  • Nandina Domestica (Moyer’s Red)
  • Osmanthus Burkwoodii
  • Osmanthus Delavayi
  • Pittosporum Tobira (Mock Orange)
  • Pittosporum Tobira Variegata
  • Rhaphiolepis Umbellata (Gulf Green)
  • Viburnum Carlesii (Compactum)
  • Cupressocyparis Leylandii (Leyland Cypress)
  • Lavandula Stoechas Otto Quast (Spanish Lavender)
  • Lavandula Intermedia Grosso (Fat Bud French Hybrid Lavender)

Grasses

  • Carex Buchananii (Viridis)
  • Carex Morrowii (Ice Dance)
  • Carex Pendula (Drooping Sedge)
  • Festuca Glauca (Elijah Blue)
  • Liriope Muscari (Big Blue)
  • Liriope Spicata (Silver Dragon)
  • Ophiopogon Planiscapus Nigrescens (Mondo Grass)
  • Pennisetum Alopecuroides Moudry (Fountain Grass)
  • Phormium Tenax Rubrum (Red New Zealand Flax)
  • Phyllostachys Nigra (Black Bamboo)
  • Stipa Tenuissima (Mexican Feather Grass)
  • Yucca Filamentosa (Adam’s Needle)

Perennials

  • Helleborus Hybrida (Ivory Prince)
  • Helleborus Orientalis (Blue Metallic Lady)
  • Hosta Hybrid (Krossa Regal)
  • Hosta Sieboldii (Elegans)
  • Lilium Oriental Lily

Vines

  • Clematis Armandii (Snowdrift)

Ground Covers

  • Veronica Repens (Georgia Blue)
  • Perennial ryegrass and fescue mix for front lawn

Fallen giant

This Sunday was a very sad day for me. During a weekend visit to the property, we became aware that the beautiful, mature, giant Douglas fir tree standing majestically on the hillside next to us had snapped in half during a brief period of wind gusts on Saturday. For probably about 75 years, this beautiful tree has hosted bald eagles, osprey, and thousands of other birds scoping for prey, cleaning their feathers, or just enjoying a nice view of the Sound. I’ve seen as many as three bald eagles on this tree at once and it was one of the first things that attracted me to the property.

This guy got a few minutes of alone time before his buddies showed up.

This is what the tree looked like before this weekend.

The top portion of the tree had been dying for quite some time and I never expected any regrowth, but neither did I expect the 18-inch diameter upper trunk to snap completely in half during what I would consider fairly moderate winds. The right gust must have just hit the right angle for the right duration and the old guy cried uncle.

This is what the tree looks like today.

A close-up of the carnage.

We’re only four or five weeks away from finally moving in, so it’s incredibly sad to see our favorite element of the landscape decimated before we could really enjoy it, but on the bright side, the tree itself is still up, and what remains is alive and presumably well. It’s still high enough to where the eagles may come back (fingers crossed) but it just isn’t the same without those thick bare limbs providing the equivalent of park benches to our high flying neighbors.

First-world problems, yes, I know… but it’s still incredibly sad. I would have rather seen every piece of vegetation on my property go before that tree.

Landscaping and lawns

There will be another post on landscaping coming shortly, but does anyone have any experience using evergreen “ground cover” as a lawn replacement? We were thinking about just sodding some lawn in initially, but this weekend, we saw some interesting stuff called Stepables which is essentially a collection of evergreen plants you can use in lieu of grass. The stuff apparently only grows 1 or 2 inches tall, never needs mowing, and can be trampled on almost as vigorously as a traditional lawn.

My feeling about lawns is that they are only as nice as the time you’re willing to put into them, and I can’t say I’m willing to put a ton of time in. Evergreen ground cover seems like a really attractive option, although I can’t say I know anyone personally who’s tried it yet. It doesn’t seem to look quite as good as a nicely mowed lawn, but I’d settle for decent looking if it meant zero maintenance… especially if I could walk on it to release an awesome minty fresh scent.

This stuff is called “Blue Star Creeper”. Sounds smokable.

Interior metalwork is complete

Although there are still exterior awnings and deck railings to fabricate, all of the interior metalwork is now complete. Thanks to the precise skills of Pacific Northwest metal master Olda Zinke, I now have interior steel railings all around the house that look like this:

The railing above is from the catwalk, and there are also rails lining two flights of stairs. Photos of those are available in the gallery. It’s a bit unfair to Olda to show these photos at this stage because the railings are still dusty and the stair treads are only temporary (homemade thick bamboo treads will be going in shortly) but I’ll post plenty more shots when everything is all cleaned up and fully fabricated.

If you look through the shots in the gallery, you’ll notice that the stairs are made with one hot-rolled steel stringer on each side attached to the cold-rolled steel railings. This was a bit of a surprise to me as I was expecting a single steel beam down the middle supported the treads from the center. The communication between Build and me could have been a lot better here, but in the end, I think the two stringer system may be a better overall look, especially considering one is recessed into the wall, providing a nice viewport through the treads to the panaromic view behind them.

Costs accrued during this stage:

Interior metalwork (Olda Zinke)$21,765.86
Metalwork delivery charge (Pacific Delivery Service)$316.91

Interior design is harder than it looks

So far the toughest part of this project for my girlfriend and me has been picking interior finishes; particularly counters and tiles for the bathrooms. Having been in thousands of bathrooms before, we thought this would be a relatively easy endeavor. So much so, that we unfortunately gave ourselves only about a month of time to look at showrooms and select products.

Build has talked about choice and how too much of it can actually lead you away from happiness instead of towards it, and nowhere is this more apparent than in kitchen and bath showrooms. There are thousands of tiles, thousands of countertops, and thousands of faucets, sinks, and towel bars to choose from. It’s so overwhelming, in fact, that I don’t even have another life experience to compare it to. If you were remodeling and you just needed to pick a new floor tile, that might not be so bad, but when you’re starting from scratch, you need to pick somewhere between 5 and 20 products, all of which must go great together. An employee at one of the tile stores told us to expect five trips to the store for every room you have.

After 20 or so trips to different stores, we found ourselves still at square one. A few ideas had emerged, but we lacked the confidence to try and put everything together on our own.

It was at this point when we finally cried uncle and sought the help of an interior design firm. Through the recommendation of a friend, we called Nancy Burfiend and Lana Noble of The NB Design Group and asked if they’d be willing to give us a bit of a last minute triage for our problem. Nancy’s firm is very high-end and usually comes in a lot earlier in a project, but given that we just needed to make a quick decision on tiles, countertops, and a few other things within a couple weeks’ time, she agreed to provide us some overall direction, answer our questions, and present a couple of options, all within a compressed time frame and on an hourly fee schedule.

This beautiful shot from The NB Design Group’s portfolio was one that attracted us to working with Nancy.

Aside from providing some excellent tile options, NB also gave us some great advice we wouldn’t have otherwise considered, including:

  • When you’re dealing with a small space, as we are in our bathrooms, you should try to use big tiles. Big tiles make small spaces seem bigger.
  • Use the same color tile on the floor as you do on the tub surround in order to keep the space from looking broken up.
  • Don’t be afraid to run tile clear up to the ceiling.
  • Use similar elements in all bathrooms in order to keep the house from feeling too “novelty”.
  • Be careful not to use too much overhead lighting in bathrooms as it’s poor for applying makeup.
  • Frosted glass on shower doors can make bathrooms look smaller.

In retrospect, it’s a bit silly to think we could have done a great job designing our kitchen and bathrooms without at least a small amount of help from interior design professionals. I have a self-service mentality about a lot of design work, but it was a major miscalculation to let this important element go so long without dedicated, professional help. In the end, we took a lot of NB’s advice and selections while at the same time providing a few materials of our own, as well as following Build’s advice for much of the rest of the interior. We won’t know for sure until everything is installed, but by seeking out a great interior design firm, our confidence has gone from about a 1 to maybe a 9.

If I have any advice for aspiring home builders, it would be to not overlook this step. It’s extremely difficult to get perfect and should not be left to last minute. Whether you seek out a full-service firm like NB or just use a solo interior designer, the end result is bound to be better than what you’d do on your own.

Costs accrued during this stage:

Interior design consulting (NB Design Group)$1,931.25

Architectural visualizations using holograms

As readers of this blog know, I’m a huge fan of photorealistic 3D modeling to aid the architectural design process. In the course of building this house, I had a idea for an invention which could potentially be even more useful than 3D renderings in some cases. I may end up pursuing it… we’ll see.

Via Freshome, however, comes this nifty piece of technology:

A holographic display to aid in the visualization of your new home. Very interesting stuff. It still doesn’t solve the spatial problems I’m looking to solve with my idea, but it’s interesting and potentially useful nonetheless. How much would I have paid for something like this during the design process? Probably only a grand or two. Seems useful though.